L’Oreal – Tuxedo Noir

I managed to snag this polish when we were in the US in May form the reduced section in a nearby Walmart.  I believe this might be from the Shades of Grey collection that L’Oreal brought out and I do love a black polish!  Lets have a look at some pics.

This slideshow requires JavaScript.

Ooohhh black and shiny.  Whats not to love?  Formula was a bit on the thick side, so if you did one thick coat you’d probably be OK.  I did two thin-ish coats out of habit really.  It does dry a bit matte so I used my Nails Inc Kensington Top Coat to bring out the shine and I think that helps.

What do you think?  I know there was a bit of a run on the holographic shade from this collection and I couldn’t find that anywhere, nor any other shades from the collection.

Did you manage to get any of the collection?  Let me know in the comments!

Don’t forget that you can follow this blog via Bloglovin’, either by clicking the icon to the right or by clicking here. I can also be found on Twitter @BakingNails

Claire’s – Leopard Top Coat

I have a polish I picked up from Claire’s in their recent £2 polish promotion, can’t really argue at that price! I was super intrigued by this polish as it has black leopard spot shaped glitter in it, along with some lovely blue leaning flakies and shimmer. Lets see how I got on…..

This slideshow requires JavaScript.

What you see here is one drop and spread blob on polish over a base of Nella Milano Crystal Coral* (review coming soon).  Now I will be blunt, this was a NIGHTMARE to work with.

There is simply too much base coat per spot ratio.  Meaning that in order to get the few you see on my nails here, I had to fish, for a while and do the wipe and grab technique on the neck of the bottle.  The base if very thick so I have probably gunked up my bottle to the point of it never opening again – despite cleaning it!  I probably could have guessed that by looking at it, but I really wanted to see what it looked like.

I really love the flakies, and who doesn’t, but its horrid.  The effect is OK, but perhaps over a darker colour, such as a gray or purple I’d probably get a better look.  On the plus side, the flakies lie flat as does the glitter.  Although as my top coat was drying I did push it down with my nail just to make sure it wasn’t going to spring up and annoy me when dry.

You can find it here on the Claire’s website, RRP is £3.50 although I bought mine in a promotion.  Have you tried this polish?  Did you have more luck than me?  Let me know what you think in the comments.

Don’t forget that you can follow this blog via Bloglovin’, either by clicking the icon to the right or by clicking here. I can also be found on Twitter @BakingNails

*Disclosure: This product was sent to me for review but this does not influence the opinions expressed in this blog which are entirely my own.

Spotted! Updated Maybelline Color Show Stands 

Further to my quick post on the new Maybelline Color Show All Access NY top coats, I’ve now seen a fully updated stand.  Seems that we are only getting the black and red toppers, not the others as seen in Europe as on the Gemey-Maybelline Site here.

First up, a close up of the red and white topper.  Yes there are hearts in there.

Below is that stand has has the inserts updated.  You can clearly see the two names.  Also note that the Color Show bottles have been updated with 60 Seconds on them…Moving along the display, you are see there are more than the two Dr Rescue products I saw in another stand.  Seems there are four of them – from left, All in One, Gel Effect Top Coat, Base Coat and SOS Balm.  Curious to see what that last one, the Superdrug website doesn’t help.

Did you pick up any of these this weekend?  Let me know what you’ve spotted in the comments!

Don’t forget that you can follow this blog via Bloglovin’, either by clicking the icon to the right or by clicking here. I can also be found on Twitter @BakingNails

Born Pretty Stamping Plate BP-L020

*Disclosure: This product was sent to me for review but this does not influence the opinions expressed in this blog which are entirely my own.

I’ve been sent some lovely Born Pretty Plates to play with and I have a couple of looks I am going to share with you this week.  First up is this look using BP-L020 a plate filled with lovely lacy designs.  I was quite taken with this plate and I wasn’t sure where to start.  But in the end I plumped for the lace pattern at the bottom left of the image.

This slideshow requires JavaScript.

I used a base of Barry M Gelly Lychee to provide a nude base so that it wouldn’t detract too much from the stamping.  I then stamped over the top, using WnW Black Creme that I keep in my stamping stash, before sealing it all in with my Nails Inc Kensington Top Coat.  I did managed to smear my thumb nail and so just dropped in a little bit more stamping because I was running out of time to get this finished.

I love how classy and clean this looks, I think anyone would be able to carry off this design and colour way.  It provides interest without being too in your face.  The quality of the stamp plate is great, the designs are smaller than those you would find on a MoYou XL plate, but bigger than those on the regular plate.  They are a good size for my nails.  I also used my Creative Stamper which I find works really well with the BP plates and delivers a crisp image onto the nail.

Born Pretty have provided me with a 10% off code for all my readers, so if you like the look of this, or any of the next few products I have to shared with you, please feel free to use it. The code is ULG10.  There are lots and lots of lovely things available via the store. Let me know what you get in the comments!
ULG10 Don’t forget that you can follow this blog via Bloglovin’, either by clicking the icon to the right or by clicking here. I can also be found on Twitter @BakingNails

*Disclosure: This product was sent to me for review but this does not influence the opinions expressed in this blog which are entirely my own.

NOTD – Dior Diorific Diva

Another day, another NOTD post.  This one is Diva from Christmas 2012, I think.  I love this, but sometimes, for some reason, I have problems with it.  My top coat as caused shrinkage and left me with some dents.  Despite having been applied over an hour beforehand.  Ugh.

Anyway, gotta love that bottle.  And the eleventy billion other black shades I have in the stash!

Don’t forget that you can follow this blog via Bloglovin’, either by clicking the icon to the right or by clicking here. I can also be found on Twitter @BakingNails

OMG Nail Strips

*Disclosure: This product was sent to me for review but this does not influence the opinions expressed in this blog which are entirely my own.

I was really pleased that OMG Nail Strips reached out to me to test out their Nail Strips.  I’ve tried a few in my time and I’ve not been much of a fan as they always make my nail feel fat or make my nails feel tight.  And the inability to scratch properly also drove me crazy.

I picked out a couple of designs from their impressive range and I’ll show you how I got on below.  Now if you visit my blog regularly, then you know I tend to show my images in a slide show.  But I think on this occasion, I won’t do that, so that it is easier for you to follow my experiences of application.

So to get started, I removed all my nail polish and then read the application instructions on the website. I then took my selected nail strips out of the the plastic cover they came in and this is how they looked.

IMG_7024.JPG

Here you can see the instructions on the back of the packet – quite straight forward.
IMG_7026.JPG

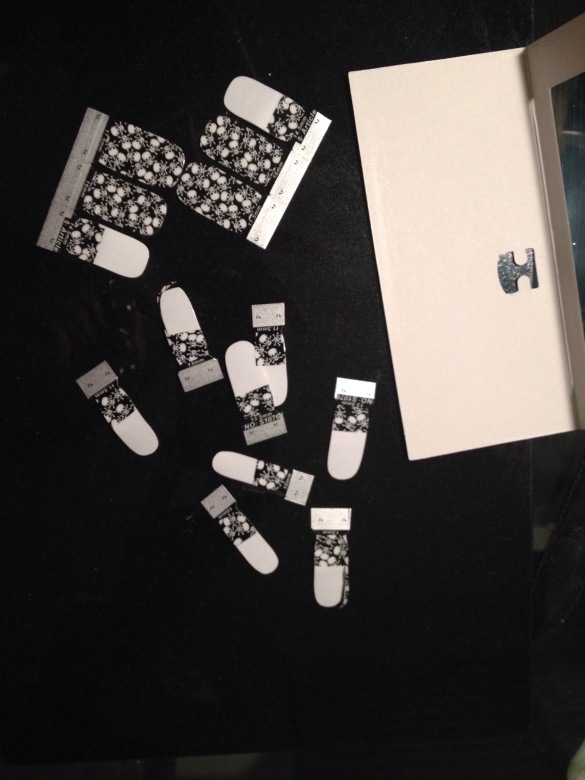
When you open up the packet, you get two strips of seven nail strips. There are two of each size and they come in a variety of sizes from 10mm to 17.5mm. There is a clear plastic layer over the nail strip to protect it which you need to remove before application.
IMG_7027.JPG

I just love this design, so I figured you’d like to see a close up too! Now I don’t have any pics of the actually application, mainly because I was too busy getting them on my nails and it was a really quick process! They are flexible and if you do make a mistake you could gently pull them off for repositioning. I was pleased to find this out. They are also hard to crease, something else that I was happy about!
IMG_7025.JPG

You cut the selected nail strip free from the rest, remove the clear top cover and then peel off the backing. I didn’t remove the entire backing because the strips are quite long and I wanted to retain the unused portion for using. So I peeled the backing partially off and the rounded end towards your cuticle and pressed down. Then I cut off the majority of the excess and used a soft hoof stick, pressing it around the edges and smoothing up towards my free nail edge. Once I was happy with my smoothing I used a glass nail file in downward motions to remove the excess. And then ta-dah! This was my first nail!
IMG_7028.JPG

After doing all 10 nails, this is what I had left – quite a bit which I could use for accent nails or pieces of nail art. If my nails were longer then clearly I would have used more of the strip. It can accommodate nails up to 3cm in length!
IMG_7029.JPG

Here are my completed nails prior to top coat. You can see a bit of crinkling and I did a bit more smoothing down with my hoof stick. I paid special attention to the edges and the free nail edge.
IMG_7030.JPG

This is with top coat. I think they are much improved with a bit of top coat, as they are real polish, they settle down and those tiny imperfections get smoothed over. It feels like real nails polish. I know they ARE real polish, but the feeling is equivalent to if I had painted them myself.
IMG_7033.JPG

I was really surprised at how quick and easy application was. I would say that it took no longer than base, two polish coats and top coat.

If you want to try these for yourself, do visit the website OMG Nail Strips. The ones I chose can be found here.  I have another design that I hope to share with you soon.

Shipping is free no matter where you live and all strips cost $7.99 and there are so many designs to choose from. If you are after some really eye catching nails or after some themed designs, then I recommend that you check these out.

*Disclosure: This product was sent to me for review but this does not influence the opinions expressed in this blog which are entirely my own.

Don’t forget that you can follow this blog via Bloglovin’, either by clicking the icon to the right or by clicking here. I can also be found on Twitter @BakingNails

Halloween Nails with MoYou Halloween Plate

I got one of the Halloween plates, before they all sold out at MoYou.  And I am glad I did as they are all gone!  This is from the Festive collection, which also includes Easter, Christmas and New Year plates.

I did a bit of a mix and match here, using some of the different images and different colours.  I love the spiders on the thumbnail – its a base of Maybelline Color Show Vinyl, Grey Beats, stamped with a variety of Sally Hansen Insta Dri polishes.  All sealed in with a coat of G&G HK Girl.

Happy Halloween!!!


MoYou Tropical Collection Plate 05 – Flamingo-a-go-go

ooohhhh I am so very pleased with these nails – I just adore them.  I took the plunge and bought another MoYou plate.  This is Tropical Collection Plate 05 and its filled with tropical birds but what caught my eye was the lovely flamingos!

These stamps are all over a base of Maybelline Color Show Black Onyx and then stamping is in four Sally Hansen Insta-Dri polishes from poundland.  I love how the pink actually pops out over the black.  Love it!

I am getting much more confident with stamping and I do love how this one looks.  I think its the first time I have used more than one colour for stamping within one mani.

Hope you like it!

Don’t forget that you can follow this blog via Bloglovin’, either by clicking the icon to the right or by clicking here. I can also be found on Twitter @BakingNails

Maybelline Color Show Vinyl Nail Polish – Speedy Swatches

IMG_6151

Ahhh how exciting, I have finally seen the new Maybelline Color Show Vinyl Nail polishes in store, and I had to grab them to show you very quickly!  These are all two coats with no base or top – you can see how they dry to a vinyl effect  Its a bit similar to others out there and its a cross between matte and shiny.

First up, Teal the Deal.

IMG_6161.JPG Now, Black to the Basics

IMG_6162.JPGThen, Record Red

IMG_6165

Finally, Punk Pink
IMG_6166.JPG

 Don’t forget that you can follow this blog via Bloglovin’, either by clicking the icon to the right or by clicking here. I can also be found on Twitter @BakingNails


Spotted! Sally Hansen Colour Frenzy

Ohhhhhhh Sally Hansen update in the UK! New Colour Frenzy range, a selection of glitter toppers in the lovely square SH bottles.

20140727-200016-72016526.jpg

20140727-200036-72036447.jpg

20140727-200033-72033470.jpg

RRP is £6.99 (ouch I know….) they are now up on the Boots website.  What do you think?  Would you pick these up or pass?  Let me know in the comments